
Each Cloudmore administrator should have their own unique login. By setting this up correctly, you can see what changes have been made by which user in the event log, making it much easier to keep a valid audit trail.
Do not use shared logins such as support@ or sales@. If you use 2-factor authentication for an administrator login, communications are sent to the administrator's contact details.
Follow the instructions below to learn how to add and manage administrator accounts.
There are three different ways to add administrators: -
1 - Bulk import a .CSV / .XML or .XMS file.
2 - Manually create multiple administrators.
3 - Add individually (recommended for single additions only).
Sections 4, 5, & 6 explain how to manage existing administrators.
Each administrator can be set up with a different role. See Section 3.2 for further detail
Note:- The minimum password length is eight (8) characters. The password must contain uppercase and lowercase characters, numbers, and non-word characters. The password cannot contain parts of the user's account name or parts of the user's full name.
1. Bulk import a .CSV / .XML or .XMS file
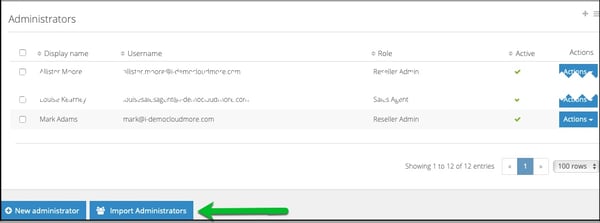
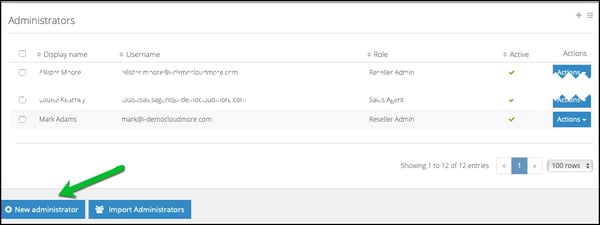
Log into Cloudmore. Navigate to your Broker menu > Broker > Administrators.
Then click Import Administrators
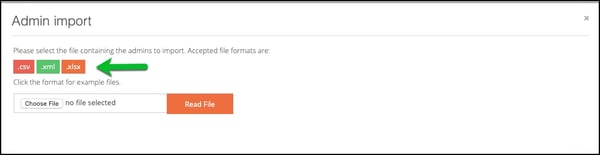
1.1 Download the import template
Click on your preferred format to download the template.
1.2 Complete the template

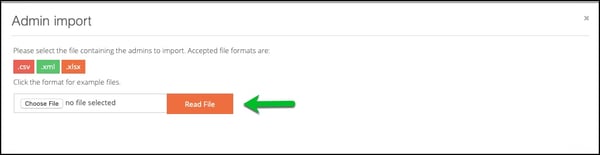
1.3 Upload your file
Click on Choose file, select your file location, and click Read File.
The data you have uploaded will display. Confirm it is correct.
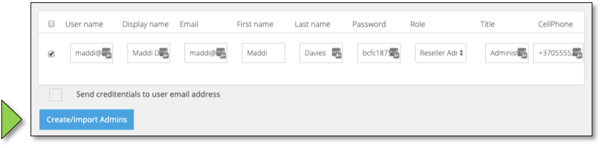
Tick Send credentials to a user email address if you want the login details to be sent directly to the new administrator.
Then click 'Create/Import Admins. The import will complete in the background.
2. Manually create multiple administrators
Navigate to your Broker menu, then click on Administrators,
Then click Import Administrators
Navigate to the Multiple Admin Form.
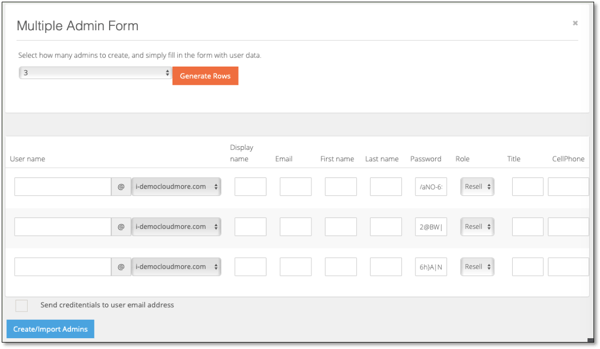
Complete the rows with the required data.
Tick Send credentials to a user email address if you want the login details to be sent directly to the new administrators.
Then click 'Create/import Admins'.
3. Add individual administrators
3.1 Enter the information for the new administrator
Complete the form, then click 'Create'.
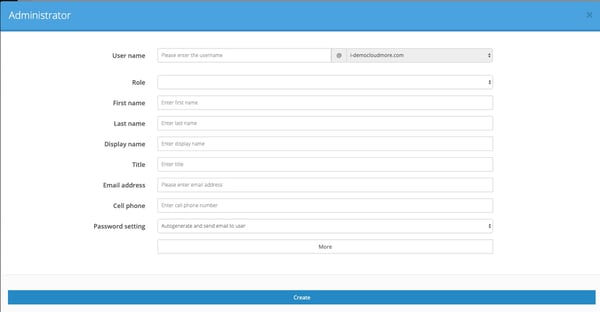
The new administrator can now access Cloudmore using these credentials.
3.2 Cloudmore Roles Matrix
|
Role in Cloudmore |
What they can do |
|
Super Admin |
This role allows the user to have full rights to all menu options in the Cloudmore menu at both Broker and Organization platform levels.Users wanting access to Cloudmore APIs must have the Super Admin role. |
|
Global Admin |
This role is similar to Super Admin but cannot change any of the Broker properties, security settings, branding or MS Azure AD Sync |
|
GlobalView Only Admin |
This role is similar to the Global Admin role and gives the user view-only access to the platform only, with no administration rights. |
|
Global Support Admin |
This role is to assist organizations. The role has a limited view but cannot make any changes to the broker level but has full control at the organization level with the exception of setting General Discount.
|
|
Global Billing Admin |
This is a restricted role allowing the user to only administer the billing areas of the platform at the Service Provider level. The user can:
|
|
Key Account Manager |
This role is intended for sales and support staff who are responsible for a subset of customers. This role provides full access at the Organization level to assigned organization records only. The user can:
The user cannot:
|
|
Key Account View Only Manager |
The role is the same as the Key Account Manager but users can only view pages with no administrative capabilities |
|
Limited Key Account Manager |
This role has the same permissions as the Key account manager role except that it is restricted so that users cannot configure approvals process settings |
|
Sales Agent |
This role is designed to enable you to provide access at the broker level to affiliates outside of your company so that they can manage multiple organizations in Cloudmore. The Sales Agent role is similar to the Key Account Manager role. You can assign organization groups to a specific admin or admins. The big difference with the sales agent role is that the admin can’t see any cost prices or margins. Only the sales price is visible to the admin in the price list and on subscription selection screens. The sales agent also has access to a billing report where they can view the billing details for all of their assigned organizations, but again, only the sales price is displayed. |
To understand the detailed permissions of each user roles, please see the
Cloudmore user roles and permissions document.
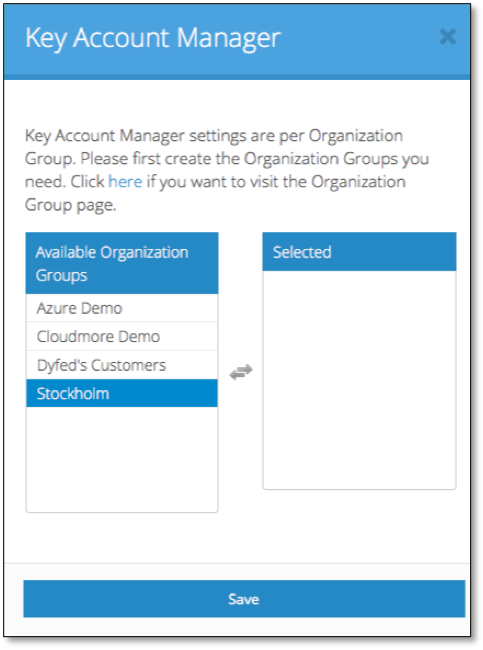
3.3 Sales Agent and Account Manager Settings
If you have created a Sales Agent, Key Account Manager, or Limited Account Manager role, a Manage option will be added to the list.

This allows you to select one or multiple Organization groups. This grants an Account Manager the ability to view a group or groups containing all of the customers that they manage.
Note: Account Manager settings are per Organization group. You need to first create the Organization groups you need before completing this step.
3.4 Create the Password
When deciding how to create a password use the Password settings option
you can: -
- ask Cloudmore to auto-generate a password and email login credentials for you.
- specify a password and email login credentials.
- specify a password and email login credentials without sending an e-mail confirmation.
4. Edit existing administrators 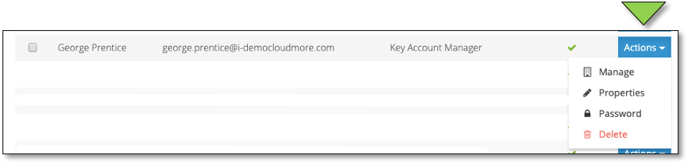
Use the action menu to edit properties, change the password or delete existing administrators.
5. Disable an administrator
To disable an account, tick the box next to each account you want to disable. Then select the list option by clicking on the ≡ icon and select 'Disable account(s)'.
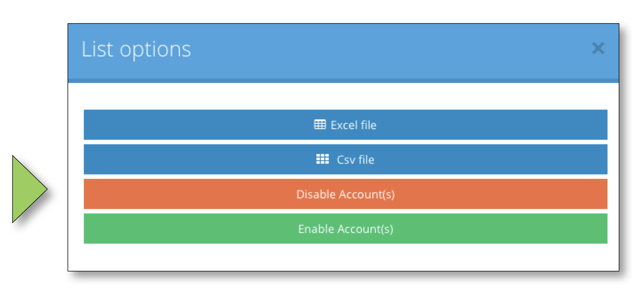
6. Export Organization Administrators
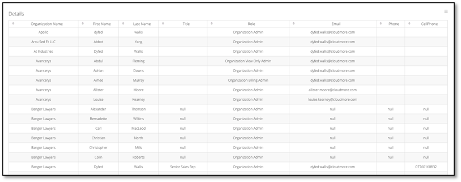
To export the profile details for organization admins, including name, role, e-mail, and cell-phone number run the Organization Admin Report
Log into Cloudmore. Navigate to your Cloud Service Broker menu, then click on Reports, then Reports.
Choose the Report 'Organizations Admin'

Press Create Report and use the Export item to create a .xls or .csv output
End
Last Updated 25/06/2021
Watch the step by step video below