
In Cloudmore your customers are known as organizations. The organizational record is at the center of your Cloudmore environment. We highly recommend that you create a record for each of your customers as quickly as possible.
Every service will be attached to an organization and, if it is a user-based subscription, it will also be attached to individual users. Organizations can also be synchronized from your systems using the systems API.
Follow the instructions below to learn how to add/create organizations.
There are five different ways to create organizations: -
1. Bulk import a .CSV / .XML or .XMS file
2. Manually create multiple organizations
3. Add organizations individually (recommended for single additions only)
4. Create organizations from a Microsoft CSP (Direct) tenant
5. Use the API to connect data from your business systems
6. Create Organisations as Key Account Manager or Sales Agent Role
7. Offboarding/Deleting an Organisation from Cloudmore
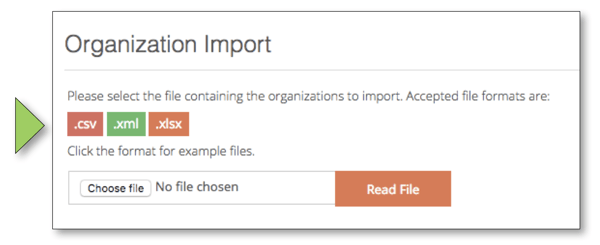
1. Bulk import organizations
Navigate to your Broker menu > Manage organizations >Organizations and Create multiple organizations.
1.1 Download the import template
Click on your preferred format to download the template.
1.2 Complete the template

Note: The fields in red are mandatory
| Name | Full customer name |
| Primary domain | The main domain name used by the customer. Do not enter HTTP or www. |
| Registration number | Company ID or tax ID. If you do not have this, you can leave this field empty. |
| Notification email | Email address where Cloudmore notifications for this customer should be sent. |
| Approval process | Add TRUE to turn on the approval process for all self-service transactions to require approval. Or FALSE if you want this to be switched off. Learn more about Approval Process. |
| Approval process Limit | Enter the value of an annual financial limit for each transaction. You will then be prompted to enter a limit. Note that monthly transaction amounts will automatically be converted to an annual amount. |
| Billing start date | Enter the date that organizations can run billing reports from. Use format DD/MM/YYYY. |
| Customer number | Enter your customer reference number. This number is included on data exports / API calls and can be used as the customer's unique identifier. |
| Street Address | Enter the first line of the customer's address. |
| Postal Code | Enter the customer's post or zip code. |
| City | Enter the city. |
| State | Enter the state. |
| Country | Enter the country. |
| Contact name | Enter your customer’s primary contact (their full name). |
| Contact phone | Enter your customer’s primary contact phone number. |
| Contact email | Enter your primary contact email address. This is used for platform notifications. |
| Contact cell phone | Enter your primary contact cell / mobile phone number. |
1.3 Upload your file
Click on 'Choose file, select your file location, and then click 'Read File'.
The data you have uploaded will display. Confirm it is correct and then click 'Create /Import organizations'. 
The import will complete in the background.
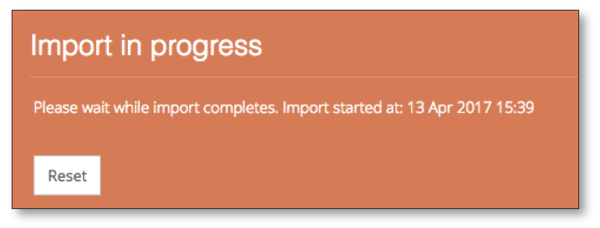
Once completed your organizations will appear in the organization's view and will be ready to have users and services added.

2. Manually create multiple organizations
Navigate to your Broker menu, then click on 'Manage Organizations, and 'Organizations'.
Click on 'Create Multiple Organizations'.

2.1 Generate rows
Click the dropdown and choose how many organizations you want to create. Click on 'Generate Rows'.
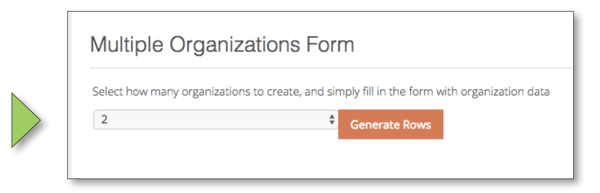
Complete the rows with the required data.

| Name | Full customer name |
| Primary domain | The main domain name used by the customer. Do not enter HTTP or www. |
| Registration number | Company ID or tax ID. If you do not have this, you can leave this field empty. |
| Notification email | Email address where Cloudmore notifications for this customer should be sent. |
| Approval process | Add TRUE to turn on the approval process for all self-service transactions to require approval. Or FALSE if you want this to be switched off. Learn more about Approval Process. |
| Approval process limit | Enter the value of an annual financial limit for each transaction. You will then be prompted to enter a limit. Note that monthly transaction amounts will automatically be converted to an annual amount. |
| Billing start date | Enter the date that organizations can run billing reports from. Use format DD/MM/YYYY. |
| Customer number | Enter your customer reference number. This number is included on data exports / API calls and can be used as the customer's unique identifier. |
| Street Address | Enter the first line of the customer's address. |
| Postal Code | Enter the customer's post or zip code. |
| City | Enter the city. |
| State | Enter the state. |
| Country | Enter the country. |
| Contact name | Enter your customer’s primary contact (their full name). |
| Contact phone | Enter your customer’s primary contact phone number. |
| Contact email | Enter your primary contact email address. This is used for platform notifications. |
| Contact cell phone | Enter your primary contact cell / mobile phone number. |
When the form is completed, click 'Create/Import Organizations'.
3. Add individual organizations
Navigate to your Broker menu, then click on 'Manage Organizations, and 'Organizations'.
Click on 'New Organization'.

3.1 Set up an organization
Fill out the fields and then click 'Create'. Click 'More' to add additional organization details.
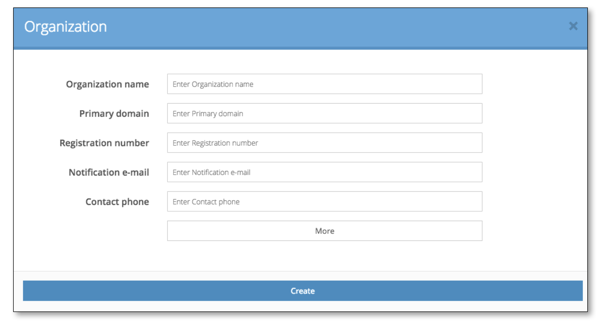
| Name | Full customer name. |
| Primary domain | The main domain name used by the customer. Do not enter HTTP or www. |
| Registration number | Company ID or tax ID. If you do not have this you can leave this field empty. |
| Notification email address | Email address where Cloudmore notifications for this customer should be sent. |
| Contact phone | Phone number. |
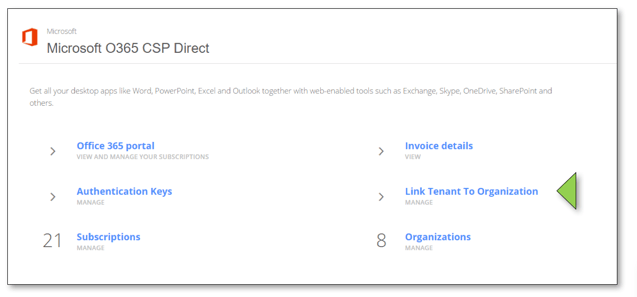
4. Create an organization from CSP tenant
If you have existing CSP (Direct) tenants, you can create an organizational record and link.
Navigate to your Broker menu, then click on 'My services' and 'Microsoft O365 CSP direct'.
Click on 'Link Tenant to Organization'.
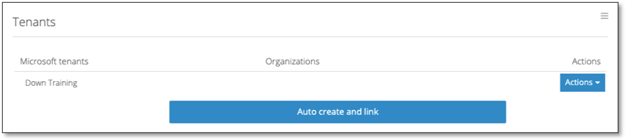
This will display the tenants that we have discovered in your partner center.
To link all tenants, use the 'Auto create and link' button at the bottom of the page. This will create an organizational record for every tenant. Note that if any of the mandatory fields are missing data in the Microsoft partner center, the organizational record will not be created. Follow the steps below to create these individually.
Tip: Use the filter to find a specific tenant record you want to create the organizational record for.
From the 'Actions' menu, choose the 'link tenant' option from the list.
The fields will pre-populate with data from the partner center.
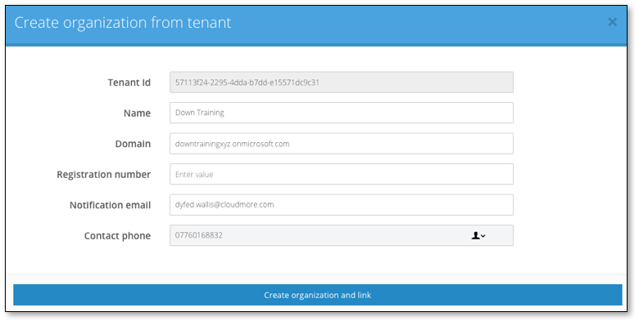
Complete any missing mandatory data (highlighted in red below) and click 'Create organization and link'.
| Name | Full customer name |
| Primary domain | The main domain name used by the customer. Do not enter HTTP or www. |
| Registration number | Company ID or tax ID. If you do not have this you can leave this field empty. |
| Notification email address | Email address where Cloudmore notifications for this customer should be sent. |
| Contact phone | Phone number. |
5. Create Organization Groups
Cloudmore now give the reseller the ability to group organizations to restrict how they are viewed and accessed in the Cloudmore Platform
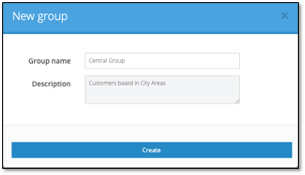
Login into Cloudmore and from Broker Menu > Manage organizations > Groups then click New Group
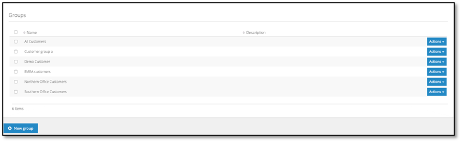
Enter a Group Name and an optional Description and then click Create
Add an organization to a Group
Open the Broker Menu > Manage organizations > Groups option
From the list presented click on the Actions button to the right-hand side of the group line
A search facility is available to filter the group options
Click Members

6. Create Organizations as a Key Account Manager or Sales Agents
The Key Account Manager and Sales Agent roles are required to belong to a Group to access Organizations.
When creating a new Organization from the on-screen form (3.1) they will be presented with an additional field called Organization groups, from the dropdown they will see the Groups they belong to as a KAM/SA and be able to assign the new organization to one of these.
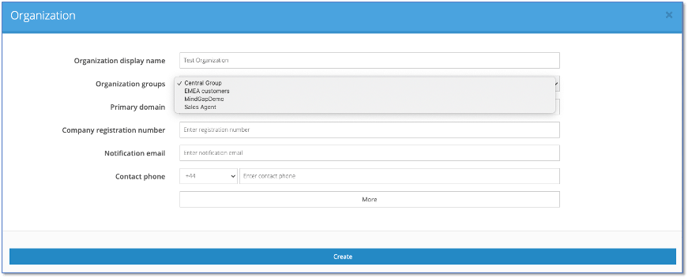
If more than one group is required this should be referred to an individual with Reseller Admin permissions.
7. Delete/Offboarding an Organisation
As best practice, you shouldn’t delete or remove an organisation record from Cloudmore for 60 days after the organisation is no longer a partner.
This will allow for credits, etc., to be billed over the preceding few months. If an organisation is deleted too soon, billing data may be added to an invoice for that organisation. However, Cloudmore will not have a record to pull it into, so your billing may not reconcile.
It is important that you offboard the organisation from the Microsoft (MS) partner centre first – this will sever the link between Cloudmore and Microsoft.
If the organisation has been removed from the partner centre i.e. no Microsoft tenant exists on the "Link Tenants" page:
- Go to my services
- Click Microsoft 365
- Click “link tenant to an organisation”
- Search for organisation
- Click actions
- Delete – this will delete the services within Cloudmore
- Lastly, you must delete the organisation record from the organisation list. Go to Broker>Organisations>Actions>Delete
If an NCE subscription is suspended, it can be made active again. If a churned organisation wants to move to another broker, they may still need this subscription/s, so removing them from the partner centre will remove your access as a broker, and they will keep their subscriptions.
Watch the step by step video guide below