To start managing the Acronis Cyber Cloud service for your customers, you need to add the Acronis service to the Cloudmore account. For this you need to complete the steps below:
Create API client
-
Go to Acronis https://cloud.acronis.com and log in with your partner credentials.
-
Click Settings in the left-hand menu.
-
Click API clients in the left-hand menu.
-
Click + Create API client in the top right corner.
-
Enter a friendly name for your API client and click Next.
-
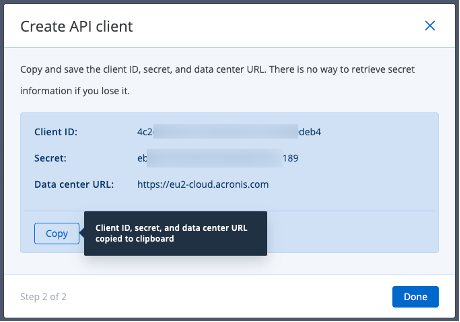
Copy the Client ID, Secret, and Datacenter URL and store them in a secure location. The secret cannot be retrieved again after this step.

Retrieve Acronis Partner Tenant ID
-
Go to Acronis https://cloud.acronis.com and log in with your partner credentials.
-
Click Audit log in the left-hand menu.
-
Find the “User signed in to the service” event created when you log in and click on the event.
-
Click JSON in the top right corner.
-
Search for “tenant_id” and copy the value of the tenant id.

Add Acronis Cyber Cloud to Your Broker
-
Log into Cloudmore with your broker user account.
-
Click Marketplace in the left-hand menu.
-
Find the service named Acronis Cyber Cloud (please ensure to choose the service that has the vendor as Acronis) and select it.

-
Click Add service at the bottom of the dialog box.
-
Complete the below fields:
-
Tenant ID – Enter your Acronis partner Tenant ID.
-
Client ID – Enter the Client ID from the API client.
-
Client Secret – Enter the Secret from the API client.
-
Base URL – Enter the Base URL from the API client.
-
-
Select the Migrate existing Acronis clients checkbox if you want to automatically migrate your existing client data to Cloudmore. You can also later add your customers individually and then add the Acronis service to their account.
Learn more about bulk import of customers. -
Click Sign Agreement to add the service.
Verify integration
After you have added the Acronis Cyber Cloud to your broker, you should create a test organization and verify the connection between Cloudmore and Acronis is established.
-
Log into Cloudmore with your broker user account.
-
Click Manage organizations > Organizations.
-
Click on + New organization and fill out the form with test data. Essential to create an organization with a name that does not exist in Acronis Cyber Cloud.
-
Click on the organization.
-
Click on E-store in the left-hand menu.
-
Find the service named Acronis Cyber Cloud and click on it.
-
Click on Add service button at the bottom of the dialog box.
-
Mark the checkbox named “I confirm that I want to add this service to this organization”.
-
Leave Tenant ID empty.
-
Click on Add service to add the service to the organization.
-
Click on Subscriptions.
-
Click on Add subscription button.
-
Enter a subscription name.
-
Click on Create button.
-
Go to https://cloud.acronis.com and log in with your partner credentials.
-
Click on Clients in the left-hand menu.
-
Verify that the new organization is on the list. It can take up to two minutes before the customer is created in Acronis, so you might need to refresh the page.
