
Once you’ve set up your Cloudmore broker account and exported the Datto Autotask companies to Cloudmore organizations, you can add the Datto Autotask service from our E-store that will automatically enable the integration.
Prerequisites:
1. Before you proceed with the integration, ensure that you’ve disabled any other third-party integration settings you’d previously enabled for billing sync.
2. Contact Cloudmore Customer Success or the Support team and request for an API Integration Code. Follow the steps below once you receive the code.
Steps
- Add a user defined field in Autotask
- Add the Datto-Autotask Service in Cloudmore
- View the Billing Information in Autotask
Add a user defined field in Autotask
You need to first add a user defined field to the contract, so that Cloudmore can store the CSP or Azure Subscription identifier to the contract which will enable the broker to match a subscription in Cloudmore to a contract in Autotask.
1. Log into your Autotask portal.
2. Click Menu > Admin > Features & Settings > Application-wide (Shared) Features > User-Defined Fields > Contracts (TAB)
3. In the Name field, type "Subscription ID".
4. In the Description field, type "Subscription ID".
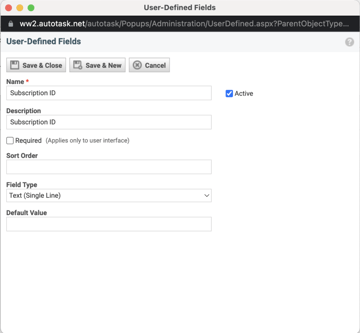
5. Click Save & Close.
Add the Datto-Autotask Service in Cloudmore
-
Login to the Cloudmore broker account.
-
Click Marketplace on the left navigation pane.
-
Search for Datto Autotask and click on the listing.
-
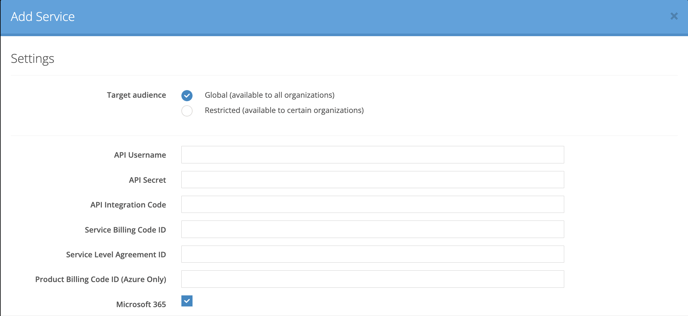
In the Service details page, click Add Service.


-
To generate API Username and API Secret:
-
- Login to your Datto Autotask account.
- Create an API User account and retrieve the API username and secret available under CREDENTIALS from the Add API User screen.(Refer to the steps here). When selecting the Integration Vendor, select “Cloudmore – CSP Automation".
6. Enter the API Integration Code received from Cloudmore (refer to prerequisites above) in the requested field.
7. For Service Billing Code ID and Product Billing Code ID (only for Microsfoft Azure service):
-
Access the Autotask REST API Explorer homepage.
-
Click Show Credentials.
-
Enter the credentials of the API user account.
-
Click Save.
-
Click Explore.
-
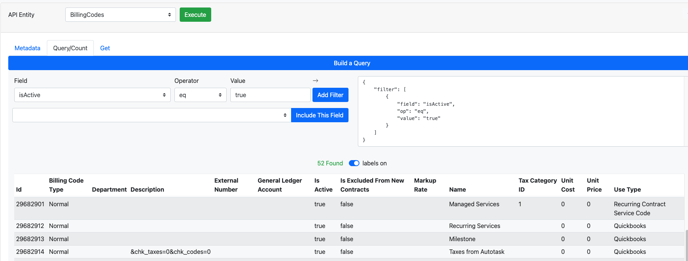
Select BillingCodes under API Entity.
-
Click the Query/Count tab.
-
Under Field, select Active and type True under Value. Click Add filter.
-
For Service Billing Code ID - Review the User Type column on the right end and identify a line with the user type as Recurring Contract Service Code. Copy the ID value for that specific line.
-
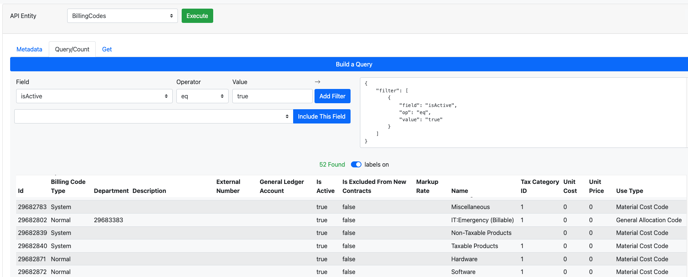
For Product Billing Code ID (Azure only): Review the Use Type column and identify lines with Material Cost Code or Product as use types. Select any ID for the identified lines.
8. To generate Service Level Agreement ID:
-
- Access the Autotask REST API Explorer homepage.
- Click Show Credentials.
- Enter the credentials of the API user account.
- Click Save.
- Click Explore.
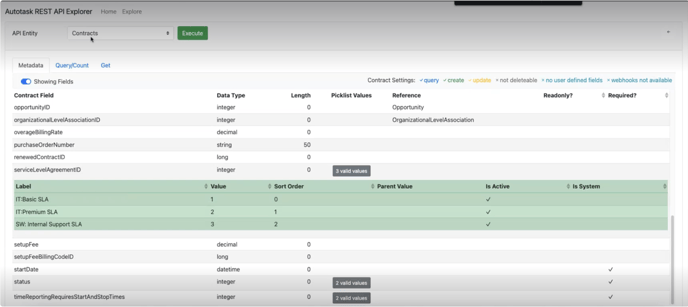
- Select Contracts under API Entity.
- Across the serviceLevelAgreementID row, note any one of the values under Picklist Values column.
9. Select the Microsoft services for which you want to generate the billing. Leave the checkbox unchecked if you don't need the billing data for that service.
10. After you’ve completed all the necessary fields in the Cloudmore page, click Sign Agreement after completing all the fields.
View the Billing Information in Autotask
Once you add the service the integration is enabled and the billing data will be exported to Autotask every 24 hours if a new bill is generated. To view the billing information:
-
Navigate to your Autotask partner account.
-
For Microsoft CSP, you can see contracts created for each service, while for Microsoft Azure, you will see one billing line that includes the total consumption and costs of the Azure services used.
-
When the integration runs for the first time, new contracts will be created. Each month thereafter, new contracts will not be created unless the customer brings in a new organisation with new subscriptions. We create a new contract for each subscription.
To view contracts in Autotask, go to:
- Top Left Corner Menu
- Contracts
- Search for the Account or click search to bring up all contracts
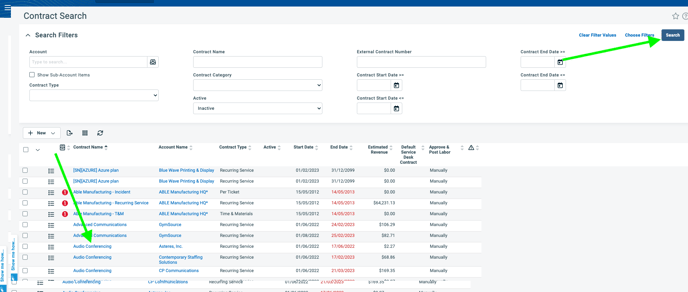
- Click into the Contract name
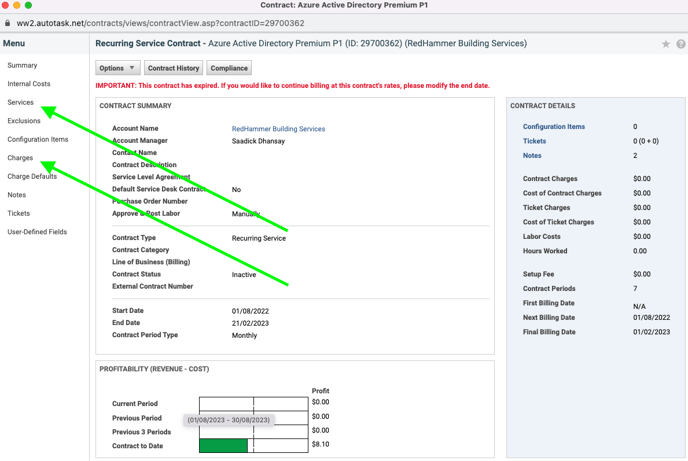
- For Azure Consumption, details will show under “Charges” and for all other products it will show under “Services”
Service
Billing information in Autotask
Microsoft CSP
-
Click the Microsoft O365 contract.
-
Click Services on the left navigation menu.
-
View the billing for the applicable contract.
Microsoft Azure
-
Click the Microsoft Azure contract.
-
Click Charges on the left navigation menu.
-
View the consolidated billing of total consumption and costs of the Azure services used.
-
Please Note: Contracts created by Cloudmore should not be deleted from Autotask without confirming with Cloudmore that they can and should be deleted. This is because the data between Cloudmore and Autotask needs to be kept in sync. Please contact support@cloudmore.com before deleting any contracts created by the Cloudmore<>Autotask integration
Any changes or adjustments made to contracts will be overwritten if they differ in the subsequent export.
Multiple Billing Lines in Cloudmore
Cloudmore displays pro-rata charges and changes in multiple billing lines in the Cloudmore UI.
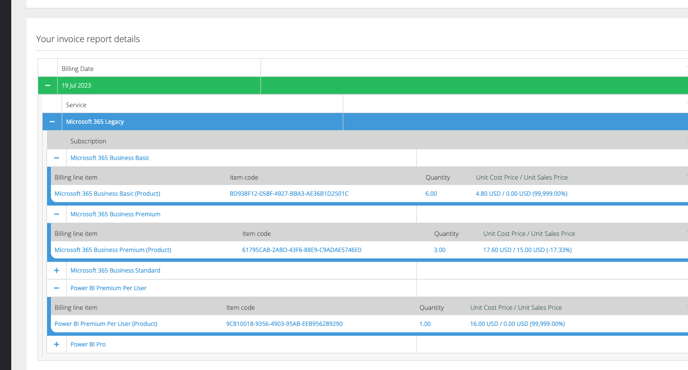
When sent to Autotask, we combine these and present one line in the contract. For all subscriptions, we take the highest quantity in the billing lines as the final total for the invoice and for Azure consumption, we total the quantity.
Learn more: