
Cloudmore allows brokers to manage the Microsoft New Commerce Experience (NCE) subscriptions that are due for renewal after the current subscription period. Subscriptions renewal time is an opportunity for brokers to make various changes to the subscriptions including the price, quantity, and payment terms. We recommend that our customers follow the below step-by-step process to make the most of the renewals.
We recommend the brokers to perform the steps below approximately a month before the renewal date to avoid any errors or last minute changes. Please note that you will not be able to make any changes to the subscriptions after the renewal date has passed.
- Run the Subscription Renewal Report Instantly
- Schedule the Renewals Report
- Set Prices which would apply after renewals
- Paid NCE Subscription Renewal Settings
- Trial NCE Subscription Renewal Settings
Run the Subscription Renewal Report Instantly
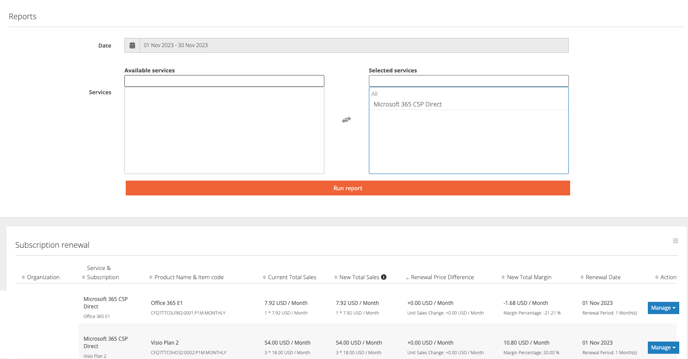
You can generate a Subscription Renewal report in Cloudmore for subscriptions that are due for renewal and review the details of the pending renewals.
- Navigate through Reports > Subscription renewal.
- Under Date, select the time range of the upcoming renewals.
- Under Services, select Microsoft 365 CSP Direct.
- Click Run report.
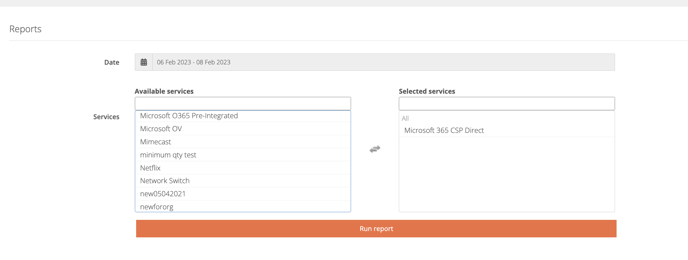
- You'll see a list of subscriptions that are due for renewal for the time period you've selected. Review the details like Subscription Name, quantity, renewal status etc. This will provide you with good insights on how many subscriptions are to be renewed and how to plan the changes ahead of the renewal date.
Additionally, you can also configure renewal notifications that can be sent to other broker admin users so they can prepare for renewals accordingly. Learn how to setup renewal notifications on Cloudmore.
Schedule the Renewals Report
Scheduling the Subscriptions Renewals Report allows you to receive the renewals report to your email periodically. Below is a quick guide to how to do that.
Under the Broker “Reports → Subscription Renewals Report”, you can navigate to the Renewals Report.
From there, you will see the familiar “Run Instantly” option.
Now we have added another tab - “Schedule Report”, which gives you the option to schedule the same Renewals Report to be sent to your inbox periodically.
More important fields are:
-
Report name - The primary identifier of the report, it’s how you would distinguish this report in the future
-
Services to include - Select from the dropdown which particular services you’d like to be included into the report. Or simple select “All services” to have everything included.
-
Note that selecting services individually (instead of All Services) will result in any future services not to be included. However, when “All Services” are selected, that means any services that will be added in the future, will be automatically included into the report as well.
-
-
Send every - This indicates the frequency at which the Renewals Report will be delivered to your inbox. Note that the period for which the renewals are shown in the report also depends on the delivery frequency. More specifically:
-
Every month - The report will include renewals for the upcoming month
-
Every week - The report will include renewals for the upcoming week
-
Every day - The report will include renewals for the next day
-
-
Send to emails - the which emails you want this same report to be delivered to. The dropdown here gives you suggestions for your Broker admin users. However, you can also add emails that are outside of your company or emails that are not associated with any Broker admin user.
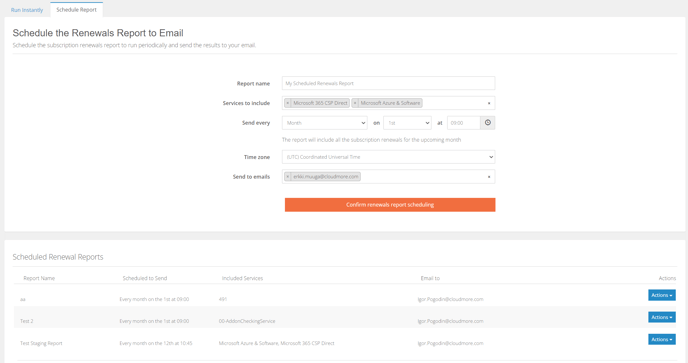
Once you have confirmed the renewals report scheduling, it will appear below in the “Scheduled Renewal Report” table.
It will show a brief overview of the scheduling.
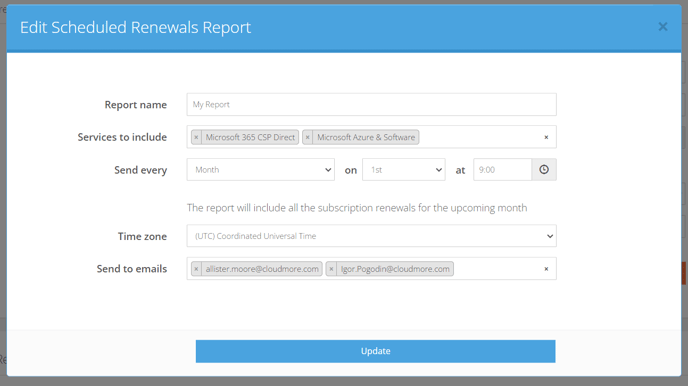
You can also change any of the data about any of the Scheduled Renewals Reports by going “Actions → Edit”.
This means you can add more recipients to the same report, change the delivery time of the report or even the frequency of the report delivery.
Review and manage the subscription prices
Brokers can set new prices for the products using the Price List functionality and schedule the price change to be implemented after the renewal. You can also check out this video to learn how to set new prices.
- Navigate through Billing > Price list.
- Under Service, select Microsoft 365 CSP Direct.
- Under Product groups, and select the applicable product group or select Search from all product groups.
- Select Specify organization and select the applicable organization if you want to manage prices for one specific organization at a time. Leave the box unchecked if you want to manage prices for all organizations you manage.
- Click Search.
- Click the Actions button across the product and select Edit.
Note: Alternatively, you can also edit the prices directly in the search list and click Update. (refer to screenshot below) and this will update the prices for new subscriptions from the current month. - To schedule the price change specifically for the renewal month, skip to Step 8.
- Under From billing month (refer to the screenshot below), select the month when the subscription will be renewed. If your current susbcription period ends at March 2023, then select April 2023 and the prices will come into effect from April.
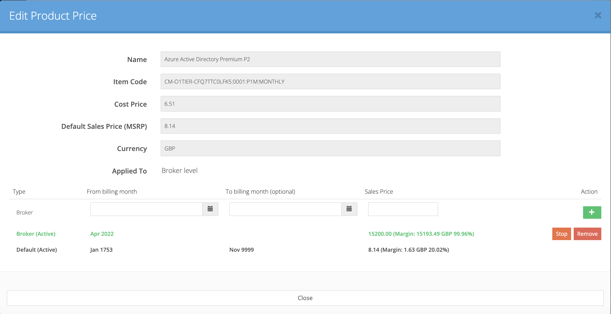
- Enter the new price in the Sales Price field to be implemented post renewal. Note that you cannot schedule this change for the ongoing month, you can only select the upcoming month for the price change.
- Click the + icon and click Proceed in the confirmation popup.
The new prices will be applied post renewal. Repeat this process for all the products for which you want to change the prices. Learn more about managing prices here.
Paid NCE Subscription Renewal Settings
Brokers can use the Renewal settings towards the end of the subscription period to make any changes to the product, subscription period, and quantity.
Follow the steps below to use the Renewal settings available on Cloudmore:
-
Log into the Cloudmore account.
-
Under Manage Organizations on the left navigation pane, select Organizations.
-
In the organization list that appears, select the applicable organization for which you want to change the renewal settings.
-
On the left navigation pane, click My Services.
-
From the list of services, select the Microsoft 365 CSP Direct service.
-
In the Microsoft 365 CSP Direct page, click Subscriptions.
-
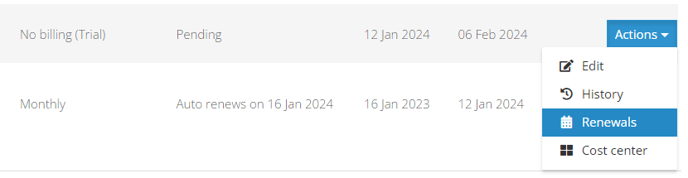
Locate the subscription for which you want to manage the renewal and click the Actions dropdown to the right of the subscription.
-
Select Renewals from the dropdown.
-
Select the Auto renew checkbox to automatically renew the subscription at the end of the subscription period. If not ticked, the subscription will be canceled at the end of the subscription period, and billing will stop.
-
The Current product field displays the current product for the subscription.
-
Under Change product to, select the product you want to switch to after the current subscription period. The list of available products have been defined by Microsoft.
-
The Current quantity field displays the current number of licenses for the subscription.
-
Under Change quantity to, enter the number of licenses you want to change to after the current subscription period. This allows you to decrease the number of license, if required.
-
The Current subscription length field displays the duration of your current subscription. Whatever changes you’ll apply will only be active after this period.
-
Under Change subscription length, you can set a new subscription length which will be applied after renewal.
-
The Current payment frequency field displays the duration after which you make payment for the subscription.
-
Under Change payment frequency, select the new payment frequency to be applied after renewal.
-
The Current Total Price field displays hows the current sales price of the subscription
19. The New Total Price field displays the future sales price after renewal.
20. Click Update Renewals once you’ve completed all the fields.
Return to the Microsoft NCE Guide.
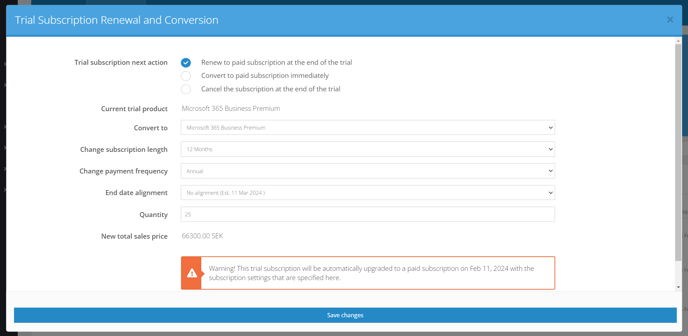
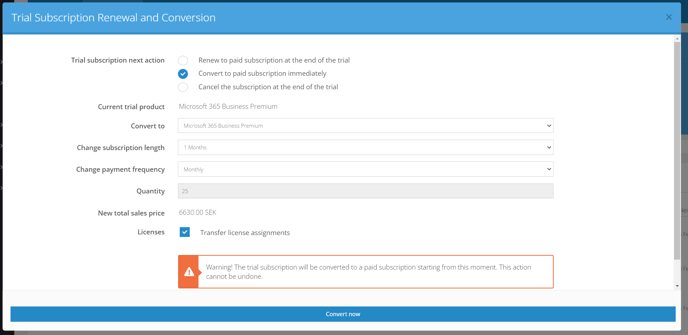
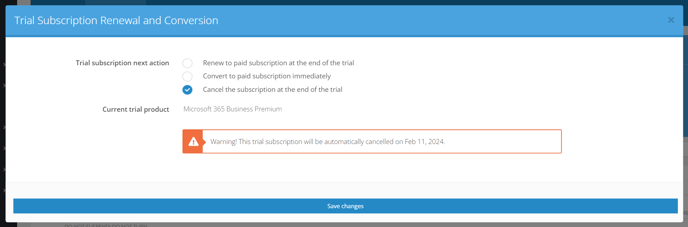
Trial NCE Subscription Renewal and Conversion
This guide will show you exactly how to set the renewal, cancellation or conversion to your NCE trial subscriptions.
When you have created a trial, simply navigate to “Actions → Renewals” to open the trial renewal settings.
From there on, you will have 3 options:
-
Renew to paid subscription at the end of the trial - This is also the Microsoft default option, which will upgrade the subscription to a paid one once the 30 days of trial has run out. However, now you can change the details with which the subscription would upgrade.
-
Convert to paid subscription immediately - This option existed before under the Actions → Convert. This option would not wait until the end of the trial, but instead will convert the trial to paid subscription immediately. This is useful for cases, where you would need to up the subscription quantity immediately and cannot wait until the end of the trial.
-
Cancel the subscription at the end of the trial - This is a completely new functionality, which allows to try out a Microsoft product, without committing to it. Your customers can simply create trials, set them to cancel and rest assured that their subscription won’t be upgraded to a paid one.
Once you have set the Trial Renewal Settings and saved changes, you can simply re-open the settings to see which settings are active for each trial.
Overall, this should encourage trying out more Microsoft trial products and ultimately result in more paid subscriptions created.